Home › Forums › Windstone Editions › Paint-Your-Own Windstone › BD's muse in progress – Mambo #3 – DONE! :)
- This topic has 34 replies, 1 voice, and was last updated 11 years, 8 months ago by Kelly.
-
AuthorPosts
-
January 16, 2010 at 5:24 am #801976
One more update before bed. 🙂
The back wing was begging to be finished. I added more antiquing with a brush against the veins and around the edge scales. Another layer of interference was added, as well as some gold accents. Gold was also dry-brushed on the edge scales, decreasing towards the center of the wing. A couple of the scales were painted gold for a little flair. The gold isn’t showing up too well in the photo. Oh well…
Side note: This is the problem with wiping paint off with your fingers. There’s a chance you will forget to wipe your fingers, and you’ll get paint where it doesn’t belong. I will need to paint over this. :spank:
This is interference paint and not the paint I used for antiquing… I really have no idea how that got there!
Another reason you shouldn’t wipe off paints with your fingers is that some of the paints contain cadmiums, lead compounds, or other chemicals that can be harmful. I really need to break that habit. Although, they apparently only cause cancer in California, so guess that means I safe. 😈 😆
January 16, 2010 at 8:04 pm #801977I painted the scale curve black and then dry-brushed it gold. Towards the end, I will antique it again (either with dark green or purple) so it matches the piece better. More gold will be added, and I will repeat this process until I’m satisfied with it. I also antiqued the belly scales (gel and yellow ochre). It’s a little hard to see. Later, I will either dry-brush the edges or add interference, maybe both. It will just depend on what I feel it needs.
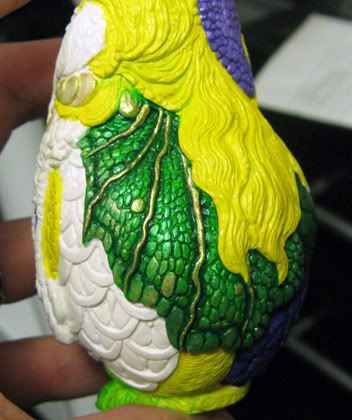
The ringed scales are next. This is the one area that will drive me nuts! When using four colors, the area is not so bad. Four colors will give plenty of variety for a muse, and I can just paint the area one color. With three colors, I find the muse just needs more (although purple would not be a bad choice for this one). If the colors are not analogous, each scale will have to be painted individually. Soooo… many… edges… to… keep… neat. *ack* 🙄 It will drive my OCD, anal-retentive self insane! :shout: But this is a Mardi Gras-themed muse, and it wouldn’t be Mardi Gras without being loud and gaudy… so individually-painted scales it is! It’s worth it in the end. These will need a lot of work – lightening or darkening their color, dry-brushing gold or interference, and maybe some really tedious antiquing.
The different colors are not randomly placed. If you notice, there is only one green scale next to the back wing. It will eventually be painted a light green so it doesn’t match the wing. None of the scales that directly touch the belly scales are yellow. This keeps the scales from “disappearing” into the nearby areas.
January 17, 2010 at 11:01 pm #801978January 18, 2010 at 12:04 am #801979Crap! I posted out of sequence. I guess it really doesn’t matter since this is where the chaos begins. I tend to start jumping around the sculpt at this point, so I will try to keep things as coherent as possible, combining posts where I can. Just know that I do a lot of touching up and re-touching of areas, darkening of antiquing, etc. as everything progresses.
Here we go…
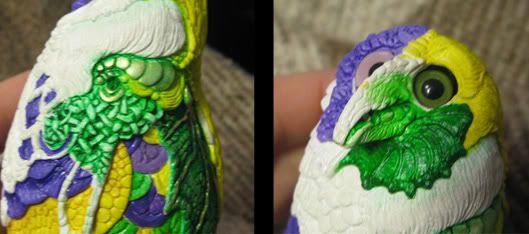
The ropes have been antiqued with a mixture phthalo green, yellow, and gel. The antiquing will eventually get darker, but it’s always best to start light. The same color was painted on the frill. The little paint that was left on the brush was roughly brushed onto the beak. The put the eyes in for the photo. 😀
The front hair was painted yellow, as well as the hair that drapes across the feathers. A blend of yellow and a small amount of green was added to the beading, a yellow-green was antiqued (with gel) into the scales with a small brush.
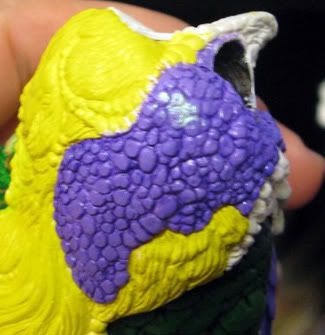
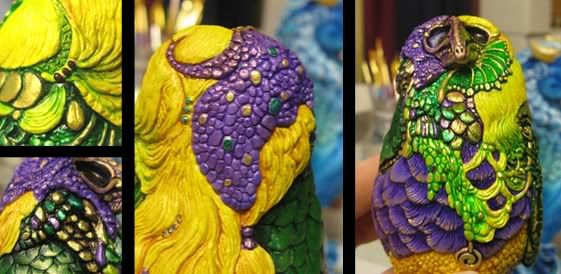
I felt the top left of the sculpt needed some purple, so I painted the “chain” across the back purple and antiqued some of the surrounding hair and nose bridge with purple as well. I needed the stain very thin, so I diluted with water and GAC 200.
Next, I antiqued the hair with gel and yellow ochre, putting more into the deeper groves with a brush. I then dry-brushed titanium white over the raised parts then coated the entire area again with yellow. The white underneath will make the raised yellow areas nice and bright. I also dry-brush a little gold over the hair to give it a nice sheen and put in the hair beads. The effect doesn’t show up well in the photo.
Dry-brushed gold over the beak and with a teeny-tiny brush added gold to the frill. I was running into trouble with the color of the green for antiquing. I couldn’t get it dark enough, so I added some raw umber to it. Thinned that with GAC 200 and water and brushed it into the cracks near the empty jewel spot and feet fur.
 January 18, 2010 at 12:56 am #801980
wow… this is gorgeous! i love seeing the progress and reading the steps you’ve taken. can’t wait to see more!
January 18, 2010 at 2:07 am #801981Wow, your muse is looking incredible as always! I love the colors on this one! 🙂
January 18, 2010 at 2:47 am #801982I just LOVE looking at these steps! I don’t think I could come up with anything half as nice-lol I have no idea how you do this so quickly! The one time I tried antiquing on a muse, I just used normal paint-no gel(?), water or anything in it…
The one ‘in progress” muse I have, I tried to dry-brush the kinda ropey area on the front and it actually ended up looking pretty cool! Thanks so much for doing this!
January 18, 2010 at 4:00 am #801983I’m glad you guys are enjoying this. 🙂
Yes, this one is coming along rather quickly, but it’s ALL I’ve been doing since I got off of work on Friday. I had a really crappy week, and I didn’t feel like doing ANY housework this weekend. I even refused to cook. 😛 😆
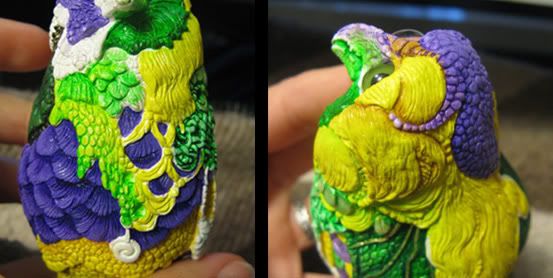
January 18, 2010 at 7:16 pm #801984OK, this is the part that will test your sanity! So many little edges to keep neat! :shout:
I worked on this most of the morning. Almost all of them are antiqued (teeny weeny tiny brush) and have either interference or gold dry-brushed across the surface.
Now it’s break time. Time to rest the eyes and partake in some chocolate. 😆
January 19, 2010 at 1:16 am #801985Wow it’s so cool to see such detailed documentation of the painting… thanks for sharing!
I love how the building up of layers just makes things pop. Pushing back with washes and pulling forward with drybrushed highlights. So cool!
You know, I had no idea the muse was so teeny tiny! It’s oddly cute! *considers getting one*
January 19, 2010 at 3:16 am #801986miggimag wrote:Wow it’s so cool to see such detailed documentation of the painting… thanks for sharing!
I love how the building up of layers just makes things pop. Pushing back with washes and pulling forward with drybrushed highlights.
Yep, that’s exactly it! It takes a while though, but I find the results are worth it. You should definitely get one. 8)Next update…
PIC 1:
Today was spa day; she had her nails done. 😆I also started on the spiral.
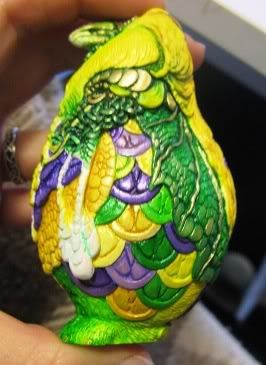
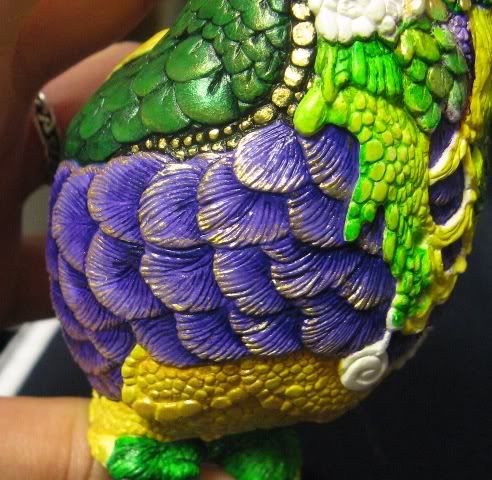
The belly scales are finished. This took a lot of back and forth. The yellow ochre that I used for antiquing just wasn’t dark enough. I added light green antquing over that (that didn’t work… majorly gross). It looked so bad, I started over. For the second attempt, I used yellow ochre with a small amount of pyrrole orange. Much better! Dry-brushed the entire area with gold. The edges were lightened with a dry-brush mixture of white, yellow, and gold. Antiqued again… dry-brushed again… wash, rinse, repeat… 😈
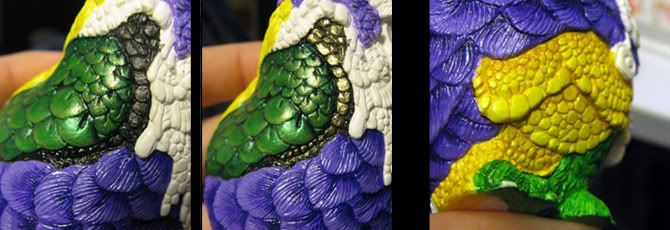
PIC 2:
The dangling jewelry in the second pic was painted with a mixture of phthalo green and yellow. Various sections were dry-brushed with gold or interference (or both), and the area (as well as the ropes above) was antiqued again with raw umber/green. Dry-brushed again, etc…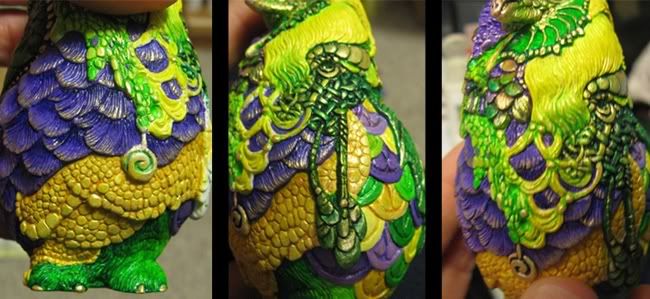
PIC 3:
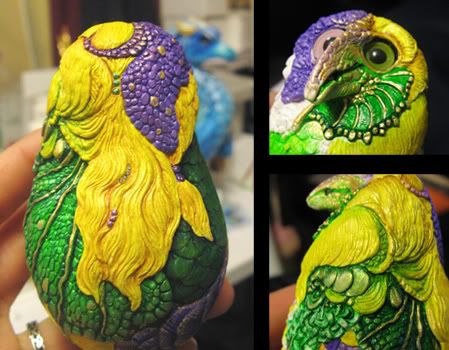
The pic is a little blurry, but I wanted to use this one because it shows the gold that was dry-brushed across parts of the hair. A light yellow-green was antiqued (tiny brush) into the draping hair and around the “dots”. I especially wanted it around the dots because gold doesn’t show up well against yellow. Maybe I should paint the dots purple???The spiral is finished and the beading under the frill is also done. Some are dry-brushed with gold, others with matching interference paints. I will continue working my way across the beading.
Almost done! 🙂
January 21, 2010 at 12:00 am #801987Getting close to the end…
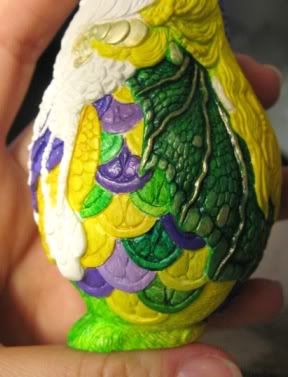
The left top still needed some purple somewhere, so I made these three beads purple.
The side beading is done. All the colored ones were done in gold first, then either the green or purple was brushed over them. These colors are nice and transparent, so it lets the gold shimmer show through.
I thought the scaled cap needed a little bit of green, so I added a few spots.
The front beading is now done, and she’s almost finished. This area was antiqued and dry-brushed (with interference and/or gold) until I was satisfied with it. Sorry, I forgot to add the eyes in for the pic. It’s kinda creepy now that I look at it. lol
Now I have to give the sculpt a once over and see what needs touching up… adding more antiquing, dry-brushing, checking the edges, etc. I already want to lighten the three purple beads I just added. They look a little dark, maybe some interference purple over them will do.
I did use a lot of gold and interference for this muse. I normally don’t use it on every single part like I did for this one… but this is Mardi Gras, it needs to be bright and shiny! 😀
If I find nothing else that needs to be done, all that’s left is to seal the sculpt, glue in eyes and jewels, and attached the felt pad. 8)
January 21, 2010 at 4:52 am #801988Looks so awesome BD! It was soooo neat to sorta watch it step by step like this… very helpful for those planning on getting into painting them or planning on bettering their painting skills :yes:
January 21, 2010 at 5:11 am #801989Looking awesome, BD! This has been wonderful to follow!
July 1, 2012 at 3:32 am #882738oooooooohhhhhh thank you for this! I need all the tuts I can get! I just sent my sister (who asked me to do this for her) links to your gallery. We’re from Biloxi and love the Saints and Mardi Gras and loved your muses on a personal level. I told her not to expect her to look this good!
-
AuthorPosts
- You must be logged in to reply to this topic.
