Home › Forums › Windstone Editions › Paint-Your-Own Windstone › BD's muse in progress – Mambo #3 – DONE! :)
- This topic has 34 replies, 1 voice, and was last updated 10 years ago by Kelly.
-
AuthorPosts
-
January 13, 2010 at 4:04 am #801962
OK, here’s a muse in progress… I can’t believe I’m letting you guys see the ugly stages. 😳
First, you pick a starting point. Since I had a Mambo with green feathers and a Mambo with gold feathers, I’m choosing purple feathers for this one. Moving up the sculpt, I’m going to make the scales green. This automatically makes the hair yellow (gold). By alternating the colors, the front belly scales will be yellow and the feet/fur will thus be green. I won’t make any more color decisions until I get these areas painted in. I find it best to wait and see how things develop.
For the purple, I chose dioxazine purple. It’s a gorgeous rich, dark purple… but you wouldn’t know that from the pictures, because purple doesn’t photograph worth crap! Grrr… 🙄
This purple (although pretty) is actually too dark, so I mixed it with titanium white. This does two things – lighten the purple and make it more opaque. After applying the purple, I added a slightly lighter shade to the edges. It’s very subtle, but it adds a little depth to the feathers. I will antique them with the purple (full strength) and tip the edges in gold later.

I’ve started on the green… hopefully I can get the pics uploaded tomorrow. 🙂
January 13, 2010 at 4:04 am #500039January 13, 2010 at 4:27 am #801963Cool! I’d like to see how people paint from the start. And I can see the depth of the feathers, already.
January 13, 2010 at 4:42 am #801964Oh!! Thank you, thank you, thank you! I am SO very excited to see this! I woudln’t have even seen the light purple on the feathers if you hadn’t mentioned it! I hope you don’t mind if I screenie the whole process for referance. I would be over the moon to be able to paint a muse as well as you!
January 13, 2010 at 7:11 am #801965Hm, I don’t believe a PYO painted by you has “ugly stages,” bayou.
January 14, 2010 at 1:24 am #801966Ha! GB, wait till I start on the rope section. LOL!
Eleu, feel free to take in as much info as you want, but I expect to see some muses painted. 😉OK, now for the green. I did the same with phthalo green, added white to lighten it and make it opaque. Although, I find it looked a little sickly/chalky so I added some yellow to brighten it up and make it more of a Mardi Gras color.
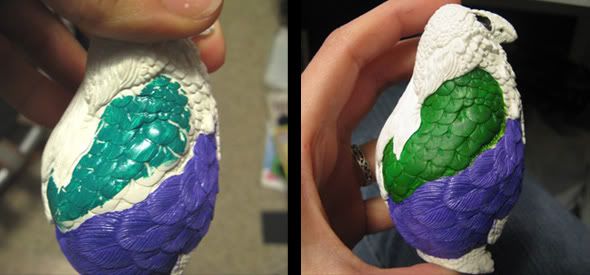
I hate the ugly stage… a big slab of bland green. I’m not starting the next section until I’ve done more to this. I added some paynes gray to the phthalo and antiqued the scales. I lightened the edges just like I did the feathers and then added some interference green (which doesn’t show in the pic). It was still a little too dark for my tastes so I lightly dry-brushed the edges with gold. It makes a really neat effect at a certain angle.
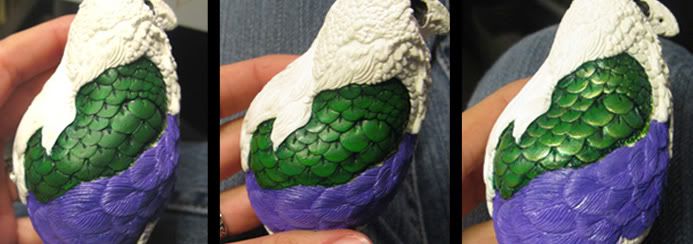
I could have fought the dark green and mixed up a whole new batch of paint and painted over it, but I just decided to work with it. The results paid off, and now I have something I like that I would not have considered adding in the first place. Sometimes, no strategy really is the best way to go. No plan is a good plan. 😈
Side note regarding antiquing: most of the time I actually just brush it into place, especially when it comes to small areas. It’s much easier to control where and how much. When I antique the feathers, it will be brushed into place.
January 14, 2010 at 4:38 am #801967I really like that green, it looks great with the lavender… 😉
Marzena
January 14, 2010 at 4:43 am #801968This is great, BD! I love seeing tutorial progress pics, it’s an excellent way to witness how the artist works on a piece. The feathers are already looking awesome, and I know this guy be just as spectacular as your other muses! 🙂
January 15, 2010 at 1:01 am #801969Another update… I blocked in the yellow belly scales and hair. Looking at the piece, I’ve decided that the scaled cap on her head will need to be purple. There would just be too much green in that area if I made the cap green. But now I have two purple areas on the back and a third would be a little much, so I guess that makes the back wing below her hair green. I’ll just have to make it a lighter green. I’ll cross that bridge when I get there. Everyone understood that? LOL
Sometimes, it’s much easier to work with four colors!
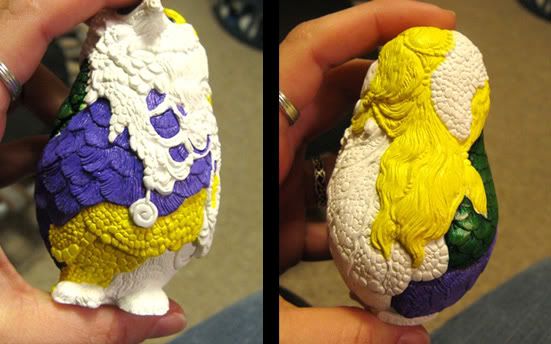
I was blocking in the green fur (a mixture of phthalo green, green gold, and a little yellow) and remembered that the back wing will also be green, so I decided to fade the fur into yellow. This way, there will be a color difference between the two areas.
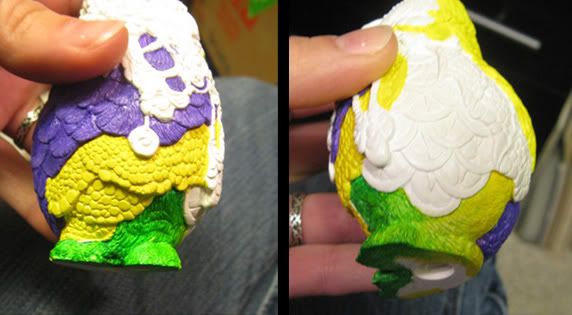
If anyone needs clarification on any of this, just let me know! 😆
January 15, 2010 at 6:17 am #801970I have a blank muse to work on, and one in progress that is an utter disaster… 🙄 Once I pick some colors I’ll follow along! 😀
January 15, 2010 at 1:24 pm #801971bayoudragon wrote:Side note regarding antiquing: most of the time I actually just brush it into place, especially when it comes to small areas. It’s much easier to control where and how much. When I antique the feathers, it will be brushed into place.
What do you mean by that? :scratch:
Read my books! Volume 1 and 2 of A Dragon Medley are available now.
http://www.sarahjestin.com/mybooks.htm
I host the feedback lists, which are maintained by drag0nfeathers.
http://www.sarahjestin.com/feedbacklists.htmJanuary 15, 2010 at 2:24 pm #801972For large areas, I apply it normally. Slather it on, then wipe off the excess… but I rarely use it that way. I will take a TINY brush and paint the antiquing into the cracks. This will be very important later when I do areas such as the feathers. It will only be applied near the feather bases and allow me to keep the tips of the feathers nice and bright. I apply it more like paint than antiquing.
I’ll post feather pics tonight. 🙂
January 15, 2010 at 6:28 pm #801973bayoudragon wrote:For large areas, I apply it normally. Slather it on, then wipe off the excess… but I rarely use it that way. I will take a TINY brush and paint the antiquing into the cracks. This will be very important later when I do areas such as the feathers. It will only be applied near the feather bases and allow me to keep the tips of the feathers nice and bright. I apply it more like paint than antiquing.
I’ll post feather pics tonight. 🙂
Now I find that very, very interesting. When you do that, do you use an antiquing gel or just the color you want, mixed with water? Or do you use something special? What if you overflow from the cracks? Do you wipe off the tiny excess?
I ask because the usual way to antique is my nemesis, but there are time when you just can’t do without!
Read my books! Volume 1 and 2 of A Dragon Medley are available now.
http://www.sarahjestin.com/mybooks.htm
I host the feedback lists, which are maintained by drag0nfeathers.
http://www.sarahjestin.com/feedbacklists.htmJanuary 16, 2010 at 2:19 am #801974I actually use all three methods, but what I use will depend on the situation.
For the antiquing gel, I use DecoArt’s staining medium and use it for larger areas. I cover the area and then just wipe off the excess with a little piece of paper towel. I often go back and add/touch up with a brush. This is how I antiqued the scales for this muse.
If I’m edging an area, I will often use a SMALL amount of straight paint. With a tiny brush I will apply the paint into a crack and then drag it into the surrounding cracks (with a moist brush or even a little gel). It’s a little tricky, as any overflow must be wiped away quickly before it dries… usually with my fingers. 😳
I do thin with water for antiquing tiny cracks (and feathers). I have fluid acrylics so I don’t have to worry about breaking down the binder and making a gooey, stringy mess. They can be thinned just like watercolors. I use this when I want more “flow”. Excess can be soaked up with a dry brush, paper towel, or anything absorbent. Be very careful though, I find even with fluid acrylics too much water (or repeated applications of such) will cause the paint to flake/peel! If I’m working on an area that I feel might be rubbed (any raised areas), I add some of Golden’s GAC 200 (to help with paint adhesion).
I also have Golden’s GAC 100 polymer (which can also be thinned with water), but I rarely use it. I find it’s not much use with fluid acrylics (that’s just me), but this could be used to thin regular acrylics paints instead of using water. If someone else uses this, please feel free to add any comments.
Here’s an example of an area where I used 2 techniques:
Gel was used to stain the area; I simply applied then wiped off. Straight paint was then applied to the edges of the big round scales then dragged into the nearby cracks.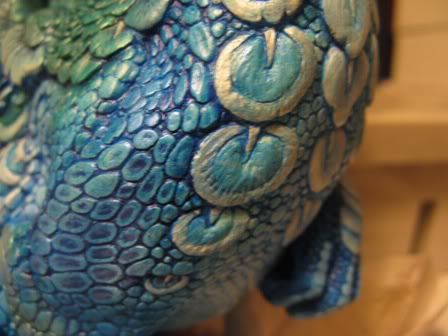
I have more pics to upload. I will try to get them up tonight.
Eleu, I can’t wait to see your muse! Feel free to PM me with any questions. 🙂
January 16, 2010 at 3:22 am #801975OK, new pics up! 🙂
I painted the scaled cap purple (mixed with some white), then the back wing (phthalo, green gold, and yellow), and drug some of the green up into the hair.
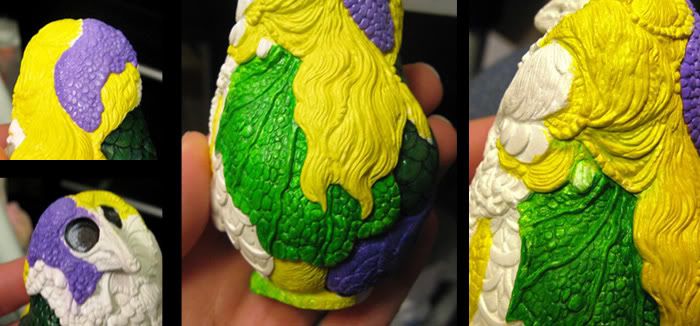
I then antiqued the wing (with DecoArt gel), added green interference, and lined the veins with gold. I’ll go back later and nit-pick some areas – adding more interference, stain, and gold towards the end. I used the gel to antique the cap, using a brush near the edges of the hair for control. Straight purple was used at the base of the feathers and blended outward with a little gel. Extra care was taken to not get it on the edges of the feathers. I found the bases were not dark enough so I went back and used straight paint that I blended with a little water. Now the edges of the feathers stand out better. I will add the gold to the edges later.
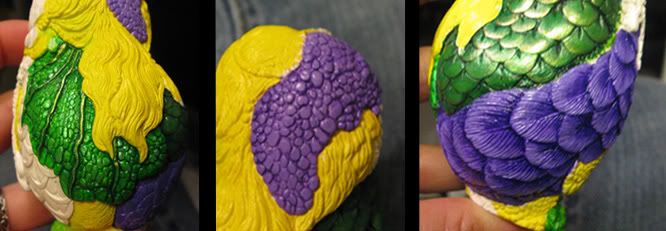
Time to plot my next move… 😀
-
AuthorPosts
- You must be logged in to reply to this topic.


Recent Comments