Home › Forums › Windstone Editions › Paint-Your-Own Windstone › Tips, Tricks, and Shenanigans appreciated!
- This topic has 10 replies, 1 voice, and was last updated 8 years, 6 months ago by Kim.
-
AuthorPosts
-
September 30, 2015 at 12:45 am #508227
I think the last time I ever painted anything was in the artsy-craftsy world of Girl Scouts when I was younger (even my high school art class didn’t use any painting–it was all pencils, inks, oil sticks, and pastels). I would really like to break into the world of PYOs but I’m a little skeptical/anxious/not sure where to start when it comes to managing acrylics. I did find the PYO tutorial which was at the least instructionally informative…but I was hoping for thoughts and opinions from actual people about the best way to go about it, especially on a budget?
September 30, 2015 at 1:54 am #935115You should look through the various PYO threads. There is so much info there. some use cheaper paints, others go the pricier route. If you have a Michaels near you and can get one of their coupons, you can use it towards a set of paints, which is nice. I’ve got a mix. Kinda depended what was on sale vs what colors they had. Many thin coats are better than thick ones. Build up the color. Again, look through some of our threads. Some of us have sets of pictures showing the progression of our pieces. Just dive in and go for it! If seriously budgeting, get the PYO first. Then decide how/what to paint it as. That way you only buy the colors you think you’ll need. Get a medium to thin the paints with and a set of brushes with a couple different sizes. When in doubt, go smaller. I haven’t used a couple of my larger ones at all. Good luck and I can’t wait to see what you paint!
Love baby kirins, safari poads, mini keepers, and anything BLUE, BLUE, and, oh yes, BLUE.
September 30, 2015 at 1:58 am #935114Well what I did starting out of pyos was go to Michael’s and buy a bunch of cheap-medium priced acrylic craft paint. I got some plain colours and some metallics and some little bottles of satin and gloss varnish for repairs and little touch ups. I also got some glazing medium to help thin and prolong the drying of the paints and some Krylon spray on varnish (in satin or gloss) to use on finished pyos. I also bought a package of brushes in different sizes. I found the white tipped brushes are pretty good. You don’t want to get the cheapest brushes and paints but the median priced ones are usually good enough. Some of the cheap brushes lose their hairs easily which you don’t want if one comes out and sticks to the paint on your pyo. You also want a little pallet for the paints and maybe brush cleaner although soap works too.
So with me just starting, I just found a spot on my table, put down some plain paper underneath the pyo (or you can use wax paper or plastic), shook up each paint, put some paints on the pallet with a drop of glazing medium in each colour, mixed them around, blended some colours and starting painting. I know some people do a base coat of white or black but I didn’t. With the first dragon I did, I pictured ahead what colours I wanted and looked over the sculpt to see where I wanted them all to go. Then I started at the top and painted the head and worked my way down the body with a coat of each shade. then I would do the wings. Then when it dried I would do a second coat of paint and try and blend each shade into the next. The medium helps with blending as the paint dries pretty fast. If it needs a third coat, go over it again. (I never thinned my paints with water but some people do. I like the paint thicker so I don’t have to do as many coats.) Then after doing the wings I did the horns and claws in gold, went over and touched up everything, blended more here and there and then when everything looked good, I took it outside on my patio, put it on some paper again on a table and sprayed it all over with the varnish, in even coats as I walked around the table. I used satin varnish but gloss is nice is you want more glossy. Satin is good for a touch of sheen. They I let it dry and sprayed another coat of varnish. Usually 2 coats is good unless it looks like you missed any spots.
Be careful not to be in a dusty, windy or hairy area if you are spraying it. If you don’t want to use spray, you can use the brush on varnish all over but I just don’t like the brush strokes and risking getting fingerprints on the piece holding it and trying to varnish it. Note: Don’t touch the pyo before the varnish dries or it will take on your finger prints. After your final coat, leave it for an hour or two, bring it in and out it somewhere to dry more for a day or two before packing it up (if you are shipping it) as it can stick to the plastic bag it came in if it’s not completely dry. Oh and while painting of course I used a cup of water to wash the brushes and paper towels to dry them when switching colours and then I would wash them with soap when I was finished. Don’t let paint or varnish dry on brushes for too long or it can wreck them. I also used q-tips to wipe off any paint on the pyo that went in a spot it wasn’t supposed to. If you wipe it off right away if you mess up, it comes off pretty easily. That’s all I can think of for now.
Looking for rainbow or pink & teal grab bags!
September 30, 2015 at 4:23 pm #935133It’s fun, you’ll love it!
Different people do it different ways; many post in their threads what methods they use/paints etc. Some people also post progression pictures of pieces in the process of being painted. (I’m not one of the good and active painters, but I did do so in my PYO thread for 2 of the pieces. Thread is here if you’re interested http://windstoneeditions.com/forum/pipsxlchs-pyos-new-old-stuff ) My method is very different from Kim’s for instance, I use paints that are thin in the first place (Golden light body brand that Windstone recommends) and layer it on slowly, working by color instead of part of the body. Both methods are used by many people with great results to each. I’d just go through as many PYO threads as you can, especially paying attention to those which explain methods/materials and why, and those which you admire the results especially.
I understand the budget part- it’s why I’m not more active a painter! My biggest recommendation for a beginner on a budget would actually be to start with cheap figures, not Windstone PYOs. Cheapy ceramics, flea market figurines, stuff like that. Even plastic or resin toys that you’ve basecoated. (I’d spraypaint them white) They can give you the freedom to experiment and get comfortable with painting without stressing that you’re ruining your mondo expensive PYO.
As for the paint, I’ve used both the ‘craft’ acrylics that Kim mentioned, and the high end (Golden) acrylics. Both have plenty of proponents here. I must admit that when I’m wotking with a high end piece like a PYO and want th best results, I go with the Goldens. They’re expensive though. To learn, I’d start with a bunch of the craft paints (Or a starter collection of acrylics) on your cheapy figures. You can upgrade if you wish as you get more comfortable.
The craft and cheaper acrylics tend to be a heavier (thicker) body, I like to use multiple thin layers so I prefer a paint that’s thinner to begin with. But there is no right or wrong.
The Golden paints tend to have a bit more richness to the shade to me also. The craft paints look chalkier. This can be altered with additives. One that will save lots of frustration is a retarder that slows drying of the paint, giving you more time to work. (acrylics dry FAST)
Windstone advises basecoating or painting the entire figure with a base coat of paint (usually white, sometimes black or a color depending on the result th painter wants). This is beause the gypsum may adsorb paint unevenly and it helps ensure even coverage of the desired paint. It also can help keep the figure from adsorbing oils from your fingers.
A good idea someone had also is to use a lazy susan as a painting platform, so you can turn it without touching it. Make sure your hands are clean and dry when you handle it, or use gloves.
As far as clearcoats, some people prefer spray ons like Krylon, some prefer brush ons. It is really a matter of your conditions (humid climate? Painting indoors? etc) and preference. Satin finish is probably the most popular; it imparts a slight sheen. Gloss is SHINY; matte is flat.
If you antique (a method to bring out the sculptural detail of the figure), it’s best to clearcoat before you antique. That way you don’t damage your paint job! Once again, some people antique some don’t. I do; I love the way it brings the figure to life.I hope this can help! But it is only my opinion.
October 1, 2015 at 8:25 pm #935238Warning: I am long winded! XD
I started painting PYOs almost 5 years ago (yeesh, it doesn’t seem like that long!), and I’ve learned a lot in that time. First thing first – do not be nervous about it! Once you get to painting these beauties you will learn they are a lot less intimidating than they appear.
Secondly – everyone has their own style in painting. Some people like to give their PYOs a primer, or have very specific types of paints that they use or think look best, or do not use paints at all (I have seen some gorgeous pieces done using only Pearlex powders!). Your strategy in painting a piece will also depend very much on what you want for the final outcome. If I am using mainly darker metallic paints, I always paint the piece black before applying them because it makes them pop and I am able to use less paint to achieve something beautiful. Likewise if I am painting it in a lighter tone, or not using metallic paints at all, I do not prime my pieces with anything at all. I prefer to paint directly onto the “naked” gypsum. Some people do not like this because the first layer of paint tends to get sucked into the gypsum.
I tend to layer lots and lots of thin coats of paint on my pieces – a finished piece may have up to 10 or more layers of paint on it by the time it is done, but since it is thinly layered, there are little to no brush marks and no details on the piece are lost (which can happen when paint is layered on too thickly). I find that this technique gives the piece more richness.
I also tend to add metallic paint to my opaque paints because I find that it gives the paint a dynamic look, and once a topcoat is applied it adds a very faint and lovely shimmer to the piece (think about car paint – it’s vivid, but you don’t really notice that it’s got flecks of sparkle until it’s right in the sun and you’re looking very close)!
I like to hand mix my paints – unless I know I need a very specific pre-mixed color, I use red, blue, and yellow and mix them together to get the color that I want. It took me quite a while to get used to this, but I much prefer it now over using pre-mixed paints, as I find it makes every piece just that much more unique when I know I’ve “created” that color specifically for the piece. If you do it this way, I would HIGHLY recommend painting swatches and saving them later for each of your color schemes, because it is MUCH easier to replicate a color scheme when you have a sample of the colors directly in front of you. I’ve sold many pieces and had to recreate a scheme going by computer images – I can get them close, but never exact unless I have a swatch!
I generally use just 3 brushes for any given piece. I’m used to their size and shape, and I work best with them. This may vary widely from person to person! I tend to do a lot of detail work on my pieces. Bristles also play a factor in your brush choice – I like to go with the softer bristles on PYO pieces as I can minimize the number of brushstrokes seen on a piece. My preferred brushes are:
Golden Taklon Filbert 6
Golden Taklon Filbert 4
Golden Taklon Round 1 (or sometimes smaller, depending on the piece!)Golden Taklon refers to the type of material the bristles are made of. It’s a soft, synthetic fiber that is used in a lot of artists brushes. Your best bet if you’ve never purchased a paint brush before is to go to your local craft store and feel them for yourself – these tend to be relatively cheap (I found them on Amazon for $4 each, and I think at my Michaels store they run about $6 each depending on the brand), but they’ve worked well for me for years.
The “Filbert” or “Round” parts are describing the shape of the brush. This webpage on Dickblick.com explains each of the different shapes really well – Filbert is good for blending (which I do lots of), and rounds are good for lines and detail work.
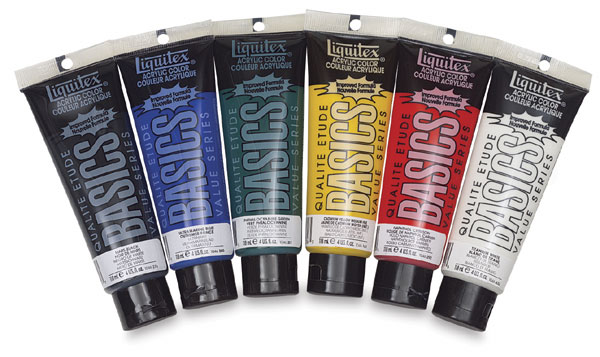
Brush shapesAs far as paints go, I prefer using Liquitex brand. I’ve been using them for years and they have always been good quality and decent priced. You can get the Basics fairly cheap – about $4 per bottle, and they last quite a while.
Folk Art metallic paint, my preferred metallic paint, which usually is around $3/bottle:

Topcoat! You’ll want one of these once you are done with your piece and you want the paint to last a long while. You’ll need a place to spray this – I generally do it outside on a nice day. Wear a mask to keep from breathing in the fumes. Do NOT spray this type of stuff indoors unless you have proper ventilation! It’s toxic! However, once you spray it on it will harden on your piece (to the touch in about 15 minutes, and it will cure, or become the hardest it can in about 24 hours) and give it a beautiful glossy shine. There are matte sprays as well if you want the lasting effect of a topcoat but no shine at all. You can get these at a local craft store for about $8 per can. My personal preference is Design Master for a glossy topcoat, and Krylon’s Matte topcoat for a matte finish.
The last thing I would highly recommend would be the use of retarder in your paints. Using a few drops of retarder when you are mixing paints thins them out very slightly, but more importantly it makes them last longer! Even if you are planning on painting your PYO all in one sitting over the course of a few hours, having retarder in the paint will keep them nice and viscous for several hours. Even using retarder, I recommend covering your paints with lids or with plastic when you are not actively using them, and definitely covering them very well if you want to keep them for several days.
The only retarder I’ve ever used is Golden, and costs about $8 per four ounces. This one bottle should last you quite a while.

I looked up each of these recommended items online and created a little “shopping list” for you. Of course they are all just recommendations, and you don’t necessarily need them all. If I were to buy myself a starter kit for painting PYOs, this would be it. Of course these prices might get better if you shop at a local craft store 🙂
Liquitex Basic paints (6 pack, 4oz per tube) ~ $25
(OR) Liquitex Basic paints (6 pack, 22ml per tube) ~ $11
Folkart Metallic paints ~ $3/bottle
Golden Retarder (4oz bottle) ~ $8
Golden Taklon Filburt 6 ~ $6
Golden Taklon Filburt 4 ~ $6
Golden Taklon Round 1 ~ $4
Design Master Clear Finish Gloss Spray ~ $8
Krylon Matte Topcoat ~ $9Assuming that you already have a PYO on hand to paint, the total cost if you were to get the smaller pack of Basics paint would be $42. If you got the larger box of paints, closer to $60. And this of course changes depending on if you want all the brushes, or just one – or decide on another one entirely, or if you get more than one bottle of metallic paint, etc! I just wanted to give you a list of what I would want if I was starting out so you can get an idea of price on several different things.
In any case, its always wonderful to see a new painter in the bunch and to see someone’s ideas take shape on a PYO – I hope you do end up getting supplies to start on one, and I look forward to seeing what you do! 🙂
Commission spots are currently closed! Please message me for details.
Please visit My Webpage to see my art and PYO's that I've done in the past!October 1, 2015 at 9:40 pm #935242You’ve gotten some Great tips and suggestions already, so I’m not to add to those… However I AM going to encourage you to paint, paint, paint! 😀
If you make a mistake (who will really know but you!) or need to start over, that’s OK! You can paint over a piece you started. Practice and perseverance is your friend. There really is no wrong way to paint a PYO.
BTW-if you’re really adventurous, there’s two days left to sign up for the Fall PYO Swap 😉 I did my first PYO for the one two years ago and it turned out better than I expected.
Don’t forget, if you go to Michaels they usually have some sort of coupon in the paper. I got my set of Liquitex paints half price with one of their 50% off one item coupons.
Good Luck and can’t wait to see what you paint! 🙂 Also – LOVE your Avatar! My Fav animals are Dragon, Tiger and Wolf – my ‘Triad’
IN SEARCH OF MY NEXT GRAILS:
Black Peacock & Butternut Adult Poads
Kickstarter 'Rainbow Tiger' Bantam Dragon*~*~*~* Ela_Hara: The DragonKeeper *~*~*~*
*** Come visit me on deviantArt at http://ela-hara.deviantart.comOctober 2, 2015 at 6:40 pm #935284Thank you all so much for the wonderful tips to help get me started. I *have* watched videos but they only help so much; I’m one of those people that learns by doing so it’s just a matter of breaking down and doing it! The positive encouragement is just what I need to get over that mental hurdle.
I truly do appreciate the comments on variation in painting styles! It gives me ideas of what to try for myself. Additionally, I hadn’t even thought of using a lazy susan…might need to jury-rig something similar but at least I can think it through first.
Hannah–thank you for the shopping list. I’m sure I could go in and browse for HOURS (I can’t help it…I like looking!) but it will definitely help to have a _set list of specific things_ to take with me for comparison.
As for –further questions–
I was wondering about metallic sheens?
I have a color scheme in mind for a piece, and it requires certain parts of the beastie having a golden glimmer over the parts. Should the gold be mixed into the base color, or is that something that needs to be applied in layers over the top? Or is mixing in the metallic just going to disrupt the main color too much? Silly question, I know, but I’m kind of a silly person.Also, if I try my hand at antiquing and am using two different colors to antique different areas, should I apply a clear coat between the layers to protect the different antiques? Or is letting one antique dry enough of a barrier?
And yes, Ela_Hara. I love my avatar too; I’ve used it for years (as I have this name, although my full avatar name RylorienLuna is rarely used). XD
October 5, 2015 at 5:34 pm #935457Thank you all so much for the wonderful tips to help get me started. I *have* watched videos but they only help so much; I’m one of those people that learns by doing so it’s just a matter of breaking down and doing it! The positive encouragement is just what I need to get over that mental hurdle.
I truly do appreciate the comments on variation in painting styles! It gives me ideas of what to try for myself. Additionally, I hadn’t even thought of using a lazy susan…might need to jury-rig something similar but at least I can think it through first.
Hannah–thank you for the shopping list. I’m sure I could go in and browse for HOURS (I can’t help it…I like looking!) but it will definitely help to have a _set list of specific things_ to take with me for comparison.
As for –further questions–
I was wondering about metallic sheens?
I have a color scheme in mind for a piece, and it requires certain parts of the beastie having a golden glimmer over the parts. Should the gold be mixed into the base color, or is that something that needs to be applied in layers over the top? Or is mixing in the metallic just going to disrupt the main color too much? Silly question, I know, but I’m kind of a silly person.Also, if I try my hand at antiquing and am using two different colors to antique different areas, should I apply a clear coat between the layers to protect the different antiques? Or is letting one antique dry enough of a barrier?
And yes, Ela_Hara. I love my avatar too; I’ve used it for years (as I have this name, although my full avatar name RylorienLuna is rarely used). XD
For a gold sheen try interference paint. However, interference paint is a little pricier than normal paints. I would not mix gold paint into any of your base colors. It will unfortunately change the color of the base.
If you don’t want to purchase interference paint (which needs to be mixed with a medium in a 1:1 ratio) then you can also try thinning gold acrylic paint way down with water to create a super thin wash.
I do not antique so I can’t answer that one. Sorry!
You can check out my work on dA & Redbubble!
https://prezaurian.deviantart.com/
https://www.redbubble.com/people/prezaurian?ref=artist_title_nameOctober 6, 2015 at 5:51 pm #935541As for –further questions–
I was wondering about metallic sheens?
I have a color scheme in mind for a piece, and it requires certain parts of the beastie having a golden glimmer over the parts. Should the gold be mixed into the base color, or is that something that needs to be applied in layers over the top? Or is mixing in the metallic just going to disrupt the main color too much? Silly question, I know, but I’m kind of a silly person.It depends entirely on the effect you are going for, but you can introduce metallic paints into an otherwise non-metallic color and still have the desired base color. If I were to mix metallic gold in with brown, it *will* lighten the brown a bit, but I can combat that by mixing the brown beforehand as a bit darker so that when the gold is added, it doesn’t lighten it too much. It will definitely change the color a little bit though. I have also used this technique with interference in my paints – I only recommend doing it if you are adding interference to a darker paint, otherwise it gets lost! Using interference will still lighten the color of the paint if you add it in, just not generally as much as metallics.
If it seems too complicated or becomes too difficult to get the right shade, I would definitely recommend using interference over the top of your base paint to get a metallic sheen (one tube usually costs about $15 but lasts me over a year of regular use). I would experiment beforehand on how thinned you want the interference though, since it can be MUCH brighter than you might expect, especially over darker colors. Sometimes thinning it a bit is the way to go. I would recommend painting your base coat on a piece of paper, letting it dry, and then experimenting with the interference over the top of that.
The final alternative is to use “gold leaf” paint – this is if you want the gold to be SOLID and look like metal (Windstone uses paint pens with paint like this to give the gold detailing you see on lots of their pieces). This stuff will NOT come off easily though, so be sure to apply it exactly where you want it – if you need to make corrections to it, you’ll likely need to paint over it.
I use “Liquid Leaf” – it comes in a few different golds, bronzes and silvers.
Also, if I try my hand at antiquing and am using two different colors to antique different areas, should I apply a clear coat between the layers to protect the different antiques? Or is letting one antique dry enough of a barrier?
I definitely recommend clear coating before and between antiquing! Let the clear coat dry for at least a day before attempting it, and be sure that when you are wiping off your antiquing medium to be very gentle. I use slightly damp paper towel or sponge, and sometimes antique an area more than once to get the desired effect.
Commission spots are currently closed! Please message me for details.
Please visit My Webpage to see my art and PYO's that I've done in the past!October 9, 2015 at 12:05 am #935614Just like to mention that I mostly use pastels on pyos, so if you have experience in that medium, it’s workable.
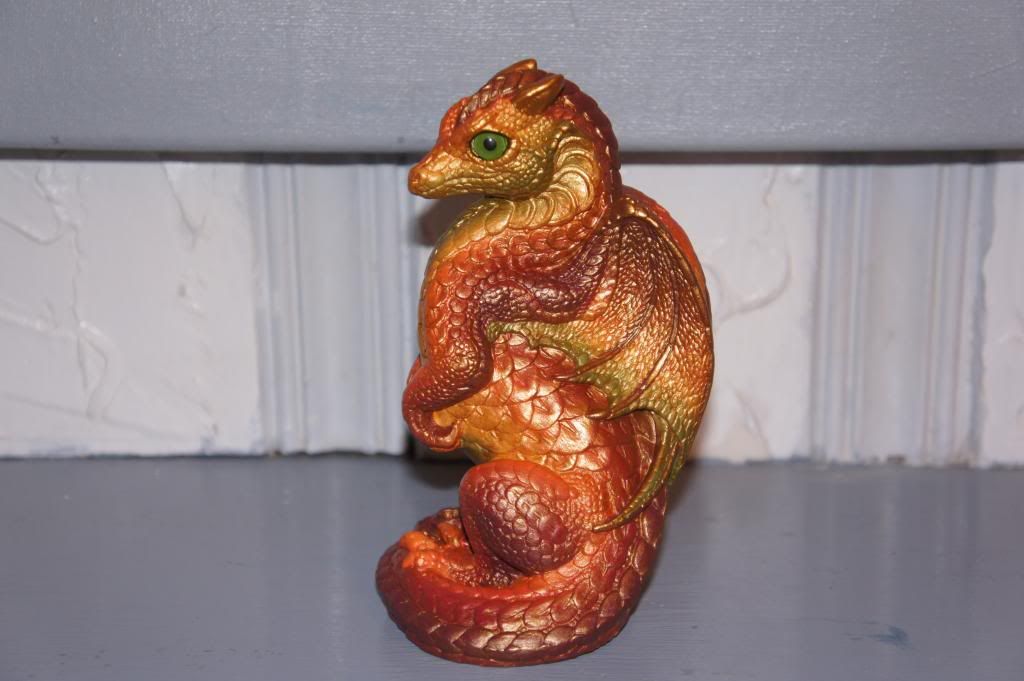
October 9, 2015 at 8:08 am #935627I painted a dragon with autumn colours but also wanted a ‘gold leaf’ look to it as well so after I painted all the base colours like a rainbow kind of then and let it dry, then I thinned down some metallic gold acrylic paint and washed the whole thing with it. Because I wasn’t antiquing, I didn’t wipe any off. It gave it a nice translucent gold shimmer and you could still see the base colours underneath so that is why I would recommend. I am not sure about clear coating between different antiqued parts. It would probably work either way but yeah if you are worried about one antique colour running onto another part then maybe do each part separately. Here is a pic of the gold autumn leaf dragon I painted. The gold doesn’t show up as much with the flash as it has more gold than it shows.
Looking for rainbow or pink & teal grab bags!
-
AuthorPosts
- You must be logged in to reply to this topic.

Recent Comments